Danh sách bài viết trong series Terraform Associate (003)
- Bài 0: Giới Thiệu Series Và Tổng Quan Về Chứng Chỉ Terraform Associate (003)
- Bài 1: Terraform Là Gì? Tổng Quan Và Vai Trò Trong IaC
- Bài 2: Cài Đặt Terraform Trên Các Hệ Điều Hành
- Bài 3: Terraform Workflow: Init, Plan, Apply, Destroy
- Bải 4: Terraform CLI Nâng Cao: Lệnh Taint, Import, Refresh
- Bài 5: Quản Lý Provider Trong Terraform
- Bài 6: Quản Lý Resource Trong Terraform
- Bài 7: Sử Dụng Biến (Variables) Trong Terraform
- Bài 8: Sử Dụng Output Trong Terraform
- Bài 9: Hiểu Terraform State Quản Lý Trạng Thái Hạ Tầng
- Bài 10: Sử Dụng Remote State Với Backend Như S3 Trong Terraform
- Bài 11: Terraform Workspace Quản Lý Nhiều Môi Trường
- Bài 12: Terraform Module: Mô-đun Hóa Cấu Hình
- Bài 13: Terraform Data Sources Truy Vấn Thông Tin Hạ Tầng
- Bài 14: Quản Lý Vòng Đời Tài Nguyên Với Terraform
- Bài 15: Tự Động Hóa Và Tích Hợp CI/CD Với Terraform
- Bài 16: Xử Lý Lỗi Và Debug Trong Terraform
- Bài 17: Tối Ưu Hóa Hiệu Suất Với Terraform
- Bài 18: Bảo Mật Cấu Hình Terraform
- Bài 19: Triển Khai Hạ Tầng Đa Vùng Với Terraform
- Bài 20: Triển Khai Hạ Tầng Serverless Với Terraform
- Bài 21: Triển Khai Hạ Tầng Container Với Terraform (ECS, EKS)
- Bài 22: Triển Khai Hạ Tầng Multi-Cloud Với Terraform
- Bài 23: Tổng Kết Series Và Chuẩn Bị Cho Kỳ Thi Terraform Associate (003)
Resource Trong Terraform Là Gì?
Resource trong Terraform là các thành phần hạ tầng mà bạn muốn quản lý, chẳng hạn như máy ảo (VM), bucket lưu trữ, hoặc load balancer. Mỗi resource được định nghĩa trong một block resource trong file .tf, đại diện cho một thực thể cụ thể trong nhà cung cấp dịch vụ (VD: EC2 instance trên AWS, Virtual Machine trên Azure). Resource là trung tâm của quá trình triển khai hạ tầng trong Terraform, và việc hiểu cách khai báo, quản lý chúng là kỹ năng cốt lõi được kiểm tra trong kỳ thi Terraform Associate (003).
Resource hoạt động thông qua provider (đã được cấu hình trong bài trước), giúp Terraform tương tác với API của nhà cung cấp để tạo, cập nhật, hoặc xóa tài nguyên.
Vai Trò Của Resource Trong Quản Lý Hạ Tầng
Resource đóng vai trò quan trọng trong việc:
- Triển khai hạ tầng: Định nghĩa các thành phần như máy chủ, mạng, cơ sở dữ liệu.
- Quản lý vòng đời: Tự động hóa việc tạo, cập nhật, và xóa tài nguyên dựa trên cấu hình.
- Tích hợp DevOps: Kết hợp với pipeline CI/CD để triển khai hạ tầng liên tục.
- Đảm bảo nhất quán: Giữ trạng thái tài nguyên đồng bộ với file cấu hình thông qua file
terraform.tfstate.
Cấu Trúc Và Khai Báo Resource
Cú Pháp Cơ Bản Của Resource Block
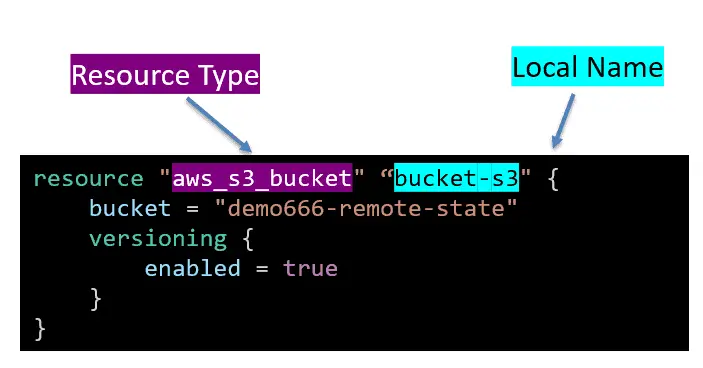
Cú pháp cơ bản của một resource block:
resource "
<PROVIDER>_<TYPE>" "NAME" {
  [CONFIGURATION]
}- `
_ `: Loại tài nguyên, VD: `aws_instance`, `azurerm_virtual_machine`. NAME: Tên duy nhất trong dự án (VD:web,db).[CONFIGURATION]: Các thuộc tính như AMI, instance_type, hoặc location.
Các Thuộc Tính Quan Trọng Của Resource
- Required Attributes: Thuộc tính bắt buộc (VD:
amichoaws_instance). - Optional Attributes: Thuộc tính tùy chọn (VD:
tagsđể gắn nhãn). - Computed Attributes: Thuộc tính tự động tạo (VD:
id,public_ip), chỉ có sau khi áp dụng.
Sử Dụng Resource Với Provider AWS
-
File
main.tf:provider "aws" { region = "us-east-1" access_key = "YOUR_ACCESS_KEY" secret_key = "YOUR_SECRET_KEY" } resource "aws_instance" "web_server" { ami = "ami-0c55b159cbfafe1f0" # AMI Amazon Linux 2 instance_type = "t2.micro" tags = { Name = "WebServer" } } output "instance_id" { value = aws_instance.web_server.id } output "instance_public_ip" { value = aws_instance.web_server.public_ip } -
Quy trình:
-
terraform init: Output:Initializing provider plugins... - Finding hashicorp/aws versions matching "~> 5.0"... - Installing hashicorp/aws v5.17.0... - Installed hashicorp/aws v5.17.0 (signed by HashiCorp) Terraform has been successfully initialized! -
terraform plan: Output:Terraform will perform the following actions: # aws_instance.web_server will be created + resource "aws_instance" "web_server" { + ami = "ami-0c55b159cbfafe1f0" + instance_type = "t2.micro" + tags = { + "Name" = "WebServer" } + id = (known after apply) + public_ip = (known after apply) } Plan: 1 to add, 0 to change, 0 to destroy. -
terraform apply -auto-approve: Output:aws_instance.web_server: Creating... aws_instance.web_server: Still creating... [10s elapsed] aws_instance.web_server: Creation complete after 45s [id=i-1234567890abcdef0] Apply complete! Resources: 1 added, 0 changed, 0 destroyed. Outputs: instance_id = "i-1234567890abcdef0" instance_public_ip = "54.123.45.67"
-
Sử Dụng Resource Với Provider Azure
-
File
main.tf:provider "azurerm" { features {} subscription_id = "YOUR_SUBSCRIPTION_ID" client_id = "YOUR_CLIENT_ID" client_secret = "YOUR_CLIENT_SECRET" tenant_id = "YOUR_TENANT_ID" } resource "azurerm_virtual_machine" "example_vm" { name = "vm-example" location = "eastus" resource_group_name = "my-resource-group" vm_size = "Standard_B1s" network_interface_ids = ["/subscriptions/xxx/resourceGroups/my-resource-group/providers/Microsoft.Network/networkInterfaces/nic-example"] storage_os_disk { name = "osdisk" caching = "ReadWrite" create_option = "FromImage" managed_disk_type = "Standard_LRS" } os_profile { computer_name = "hostname" admin_username = "adminuser" admin_password = "Password1234!" } os_profile_linux_config { disable_password_authentication = false } source_image_reference { publisher = "Canonical" offer = "UbuntuServer" sku = "18.04-LTS" version = "latest" } } output "vm_id" { value = azurerm_virtual_machine.example_vm.id } -
Quy trình:
-
terraform init: Output:Initializing provider plugins... - Finding hashicorp/azurerm versions matching "~> 3.0"... - Installing hashicorp/azurerm v3.85.0... - Installed hashicorp/azurerm v3.85.0 (signed by HashiCorp) Terraform has been successfully initialized! -
terraform plan: Output (tóm tắt):Terraform will perform the following actions: # azurerm_virtual_machine.example_vm will be created + resource "azurerm_virtual_machine" "example_vm" { + id = (known after apply) + name = "vm-example" + location = "eastus" + vm_size = "Standard_B1s" # Các thuộc tính khác... } Plan: 1 to add, 0 to change, 0 to destroy. -
terraform apply -auto-approve: Output:azurerm_virtual_machine.example_vm: Creating... azurerm_virtual_machine.example_vm: Still creating... [2m elapsed] azurerm_virtual_machine.example_vm: Creation complete after 2m15s [id=/subscriptions/xxx/resourceGroups/my-resource-group/providers/Microsoft.Compute/virtualMachines/vm-example] Apply complete! Resources: 1 added, 0 changed, 0 destroyed. Outputs: vm_id = "/subscriptions/xxx/resourceGroups/my-resource-group/providers/Microsoft.Compute/virtualMachines/vm-example"
-
Quản Lý Nhiều Resource Và Phụ Thuộc
Sử Dụng Count Để Tạo Nhiều Resource
- File
main.tf:resource "aws_instance" "web_servers" { count = 3 ami = "ami-0c55b159cbfafe1f0" instance_type = "t2.micro" tags = { Name = "WebServer-${count.index}" } } -
Output của
terraform apply:aws_instance.web_servers[0]: Creation complete after 45s [id=i-0abcdef123456789] aws_instance.web_servers[1]: Creation complete after 45s [id=i-1abcdef123456789] aws_instance.web_servers[2]: Creation complete after 45s [id=i-2abcdef123456789] Apply complete! Resources: 3 added, 0 changed, 0 destroyed.
Sử Dụng For_Each Để Tạo Resource Từ Danh Sách
-
File
main.tf:variable "instance_names" { default = ["web1", "web2", "web3"] } resource "aws_instance" "web_servers" { for_each = toset(var.instance_names) ami = "ami-0c55b159cbfafe1f0" instance_type = "t2.micro" tags = { Name = each.value } } -
Output của
terraform apply:aws_instance.web_servers["web1"]: Creation complete after 45s [id=i-web1abcdef123456] aws_instance.web_servers["web2"]: Creation complete after 45s [id=i-web2abcdef123456] aws_instance.web_servers["web3"]: Creation complete after 45s [id=i-web3abcdef123456] Apply complete! Resources: 3 added, 0 changed, 0 destroyed.
Quản Lý Phụ Thuộc Giữa Các Resource
-
File
main.tf(tạo S3 bucket trước khi tạo EC2):resource "aws_s3_bucket" "data_bucket" { bucket = "my-unique-bucket-20230518" } resource "aws_instance" "web_server" { ami = "ami-0c55b159cbfafe1f0" instance_type = "t2.micro" tags = { Name = "WebServer" } depends_on = [aws_s3_bucket.data_bucket] } -
Output của
terraform plan:Terraform will perform the following actions: # aws_s3_bucket.data_bucket will be created + resource "aws_s3_bucket" "data_bucket" { + bucket = "my-unique-bucket-20230518" + id = (known after apply) } # aws_instance.web_server will be created + resource "aws_instance" "web_server" { + ami = "ami-0c55b159cbfafe1f0" + instance_type = "t2.micro" + id = (known after apply) } Plan: 2 to add, 0 to change, 0 to destroy. - Ý nghĩa:
depends_onđảm bảo S3 bucket được tạo trước EC2.
Ví Dụ Thực Tế: Triển Khai Và Quản Lý Resource
-
File
main.tf(kết hợp nhiều resource):provider "aws" { region = "us-east-1" access_key = "YOUR_ACCESS_KEY" secret_key = "YOUR_SECRET_KEY" } resource "aws_s3_bucket" "data_bucket" { bucket = "my-unique-bucket-20230518" tags = { Name = "DataBucket" } } resource "aws_instance" "web_server" { count = 2 ami = "ami-0c55b159cbfafe1f0" instance_type = "t2.micro" tags = { Name = "WebServer-${count.index}" } depends_on = [aws_s3_bucket.data_bucket] } output "bucket_name" { value = aws_s3_bucket.data_bucket.bucket } output "instance_ids" { value = aws_instance.web_server[*].id } -
Quy trình:
terraform init: Tải provider AWS.terraform plan: Hiển thị kế hoạch tạo 1 bucket và 2 instance.-
terraform apply -auto-approve: Output:aws_s3_bucket.data_bucket: Creating... aws_s3_bucket.data_bucket: Creation complete after 5s [id=my-unique-bucket-20230518] aws_instance.web_server[0]: Creating... aws_instance.web_server[1]: Creating... aws_instance.web_server[0]: Creation complete after 45s [id=i-0abcdef123456789] aws_instance.web_server[1]: Creation complete after 45s [id=i-1abcdef123456789] Apply complete! Resources: 3 added, 0 changed, 0 destroyed. Outputs: bucket_name = "my-unique-bucket-20230518" instance_ids = [ "i-0abcdef123456789", "i-1abcdef123456789" ] -
terraform destroy -auto-approve: Output:aws_instance.web_server[1]: Destroying... [id=i-1abcdef123456789] aws_instance.web_server[0]: Destroying... [id=i-0abcdef123456789] aws_instance.web_server[1]: Destruction complete after 30s aws_instance.web_server[0]: Destruction complete after 30s aws_s3_bucket.data_bucket: Destroying... [id=my-unique-bucket-20230518] aws_s3_bucket.data_bucket: Destruction complete after 5s Destroy complete! Resources: 0 added, 0 changed, 3 destroyed.
Lưu Ý Quan Trọng Khi Quản Lý Resource
- Xác thực tài nguyên: Đảm bảo provider đã được cấu hình đúng trước khi tạo resource.
- Phụ thuộc chính xác: Sử dụng
depends_onkhi cần, nhưng tránh lạm dụng để không làm phức tạp cấu hình. - Quản lý ID duy nhất: Với
counthoặcfor_each, đảm bảo tên tài nguyên không trùng lặp (VD: dùngcount.index). - Sao lưu state: File
terraform.tfstatechứa thông tin resource, sao lưu trước khi thay đổi lớn. - Kiểm tra lỗi: Nếu
applybáo lỗi (VD: “Invalid AMI”), kiểm tra thuộc tínhamihoặc region.
Liên Hệ Với Chứng Chỉ Terraform Associate (003)
Kỳ thi Terraform Associate (003) kiểm tra khả năng quản lý resource. Bạn cần nắm:
- Câu hỏi mẫu:
- “Cách khai báo một resource AWS EC2 là gì?”
Đáp án: Sử dụngresource "aws_instance" "name" { ami = "..." instance_type = "..." }. - “Output của
terraform applykhi tạo resource là gì?”
Đáp án: Thông báo “Creation complete” cùng ID tài nguyên. - “Lệnh nào dùng để tạo nhiều resource cùng lúc?”
Đáp án: Sử dụngcounthoặcfor_each.
- “Cách khai báo một resource AWS EC2 là gì?”
- Thực hành: Kỳ thi có thể yêu cầu nhận diện cấu hình resource hoặc dự đoán kết quả khi dùng
count.
Kết Luận
Quản lý resource trong Terraform là kỹ năng quan trọng để triển khai và duy trì hạ tầng. Hiểu cách khai báo, sử dụng count, for_each, và quản lý phụ thuộc, cùng với thực hành thực tế, sẽ giúp bạn tự tin thi đỗ Terraform Associate (003). Ở bài tiếp theo, chúng ta sẽ tìm hiểu cách sử dụng biến (variables) trong Terraform.