Danh sách bài viết trong series Học Kubernetes Từ Cơ Bản Đến Chứng Chỉ CKAD
- Lộ Trình Học Kubernetes Từ Cơ Bản Đến Chứng Chỉ CKAD
- Bài 1: Giới Thiệu Kubernetes Và Khái Niệm Cluster Cho CKAD
- Bài 2: Cài Đặt Minikube Và sử dụng kubectl Cơ Bản
- Bài 3: Quản Lý Pod Cơ Bản (Create, Delete, Describe)
- Bài 4: Sử Dụng ConfigMap Và Secret Trong YAML
- Bài 5: Quản Lý Environment Variables Và Command/Args
- Bài 6: Cấu Hình Deployment Và Replica Set
- Bài 7: Thiết Kế Pod Với Nhiều Container
- Bài 8: Sử Dụng Sidecar Và Init Container
- Bài 9: Chia Sẻ Tài Nguyên Giữa Các Container
- Bài 10: Giám Sát Log Và Events Với kubectl logs
- Bài 11: Debug Pod Với kubectl describe Và exec
- Bài 12: Tối Ưu Pod Với Resource Limits Và Requests
- Bài 13: Sử Dụng Liveness Và Readiness Probes
- Bài 14: Tối Ưu Hóa Pod Với HPA (Horizontal Pod Autoscaler)
- Bài 15: Cấu Hình Service (ClusterIP, NodePort)
- Bài 16: Sử Dụng Ingress Và Network Policy
- Bài 17: Quản Lý DNS Và Load Balancing Trong Kubernetes
- Bài 18: Sử Dụng Volume (emptyDir, hostPath)
- Bài 19: Cấu Hình Persistent Volume Và Persistent Volume Claim
- Bài 20: Tổng Kết, Mẹo Thi CKAD, Bài Tập Thực Hành Cuối
Sau khi đã học cách tối ưu Pods với resource limits và requests ở Bài 12, chúng ta sẽ tiếp tục domain Pod Design (chiếm 18% trọng số trong kỳ thi CKAD) bằng việc tìm hiểu liveness và readiness probes hai cơ chế health check quan trọng để đảm bảo Pods luôn healthy, tránh downtime, và tối ưu traffic routing. Probes giúp Kubernetes tự động detect và recover từ các vấn đề như deadlocks hoặc slow startup, làm cho ứng dụng resilient hơn.

Bài viết này thuộc domain Pod Design, CKAD yêu cầu bạn thành thạo việc cấu hình probes để ảnh hưởng đến Pod lifecycle và Service endpoint. Trong kỳ thi, bạn có thể gặp task như viết YAML để thêm liveness probe cho container crash-prone, hoặc debug readiness fail dẫn đến Pod not ready. Chúng ta sẽ xem probes là gì, sự khác biệt giữa liveness/readiness/startup, types probes, parameters tuning, và cách áp dụng để tối ưu.
Probes Trong Kubernetes Là Gì Và Tại Sao Nên Sử Dụng?
Probes là các health check mà kubelet thực hiện định kỳ trên containers để kiểm tra trạng thái. Chúng giúp Kubernetes đưa ra quyết định thông minh: restart container nếu “dead” (liveness), hoặc remove/add Pod từ Service endpoints nếu not/ready for traffic (readiness). Probes đặc biệt quan trọng cho apps stateful hoặc có dependencies (e.g., wait DB connect).
Lợi ích chính:
- Self-healing: Tự động recover từ failures mà không cần manual intervention.
- Zero-downtime: Readiness ngăn traffic đến Pods chưa ready, tránh user errors.
- Efficiency: Giảm false positives từ container crashes, tối ưu resource.
- Types: HTTPGet (check endpoint), TCPSocket (check port open), Exec (run command inside), GRPC (check gRPC health).
Không dùng probes, Kubernetes chỉ dựa vào container exit code không đủ cho complex apps. Trong CKAD, probes xuất hiện thường xuyên ở tasks liên quan đến Pod reliability.
Dưới đây là sơ đồ minh họa Kubernetes Liveness and Readiness Probes, cho thấy cách kubelet interact với Pod và hậu quả của success/failure.
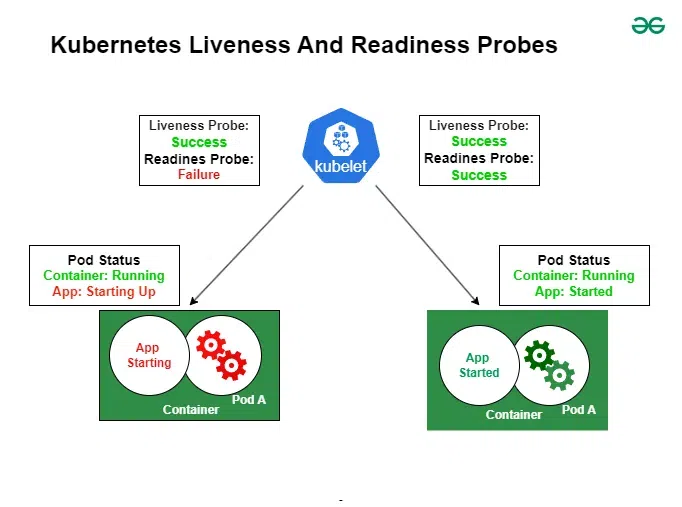
Liveness Probe: Phát Hiện Và Khởi Động Lại Containers “Dead”
Liveness probe kiểm tra nếu container còn “sống” (alive) nghĩa là app đang running đúng. Nếu fail (failureThreshold lần), kubelet restart container (theo restartPolicy).
Use cases:
- Detect deadlocks hoặc infinite loops (app unresponsive nhưng process alive).
- Self-healing cho apps crash silently (e.g., Java OOM nhưng không exit).
Nếu không set, default no liveness rủi ro Pods stuck mãi.
Ví dụ: App web fail nếu DB down, liveness check DB connect, fail thì restart.
Readiness Probe: Kiểm Tra Sẵn Sàng Nhận Traffic
Readiness probe kiểm tra nếu container ready for traffic. Nếu success, Pod added vào Service endpoints, nếu fail, removed (không restart, chỉ isolate traffic).
Use cases:
- Wait dependencies ready (e.g., DB init) trước khi serve requests.
- Handle slow startup hoặc maintenance mode.
Nếu không set, default ready ngay khi container start rủi ro traffic đến Pods chưa init.
Startup Probe: Xử Lý Slow Startup
Startup probe (beta từ 1.16, stable 1.20) check nếu app started (cho slow-start apps). Nếu fail, delay liveness/readiness để tránh premature restarts.
Use case: Legacy apps load lâu (e.g., Java JVM warmup).
Khác Biệt Giữa Probes Và Các Parameters Chung
- Liveness: Fail => Restart container.
- Readiness: Fail => No traffic (Pod vẫn Running).
- Startup: Fail => Delay other probes.
Parameters tuning (áp dụng cho tất cả):
- initialDelaySeconds: Chờ bao lâu trước probe đầu (default 0).
- periodSeconds: Khoảng cách giữa probes (default 10).
- timeoutSeconds: Timeout cho probe (default 1).
- successThreshold: Số success liên tiếp để coi healthy sau fail (default 1, min 1).
- failureThreshold: Số fail liên tiếp để trigger action (default 3).
Tune cẩn thận để tránh false positives/negatives.
Các Types Probes Và Cách Cấu Hình Trong YAML
Probes có 4 types: HTTPGet, TCPSocket, Exec, GRPC. Set trong spec.containers[].livenessProbe hoặc readinessProbe/startupProbe.
YAML Ví Dụ Cho Types Probes
apiVersion: v1
kind: Pod
metadata:
  name: probe-pod
spec:
  containers:
  - name: app
    image: nginx
    livenessProbe:  # HTTPGet example
      httpGet:
        path: /healthz
        port: 80
        scheme: HTTP  # or HTTPS
        httpHeaders: [{name: Custom-Header, value: Awesome}]
      initialDelaySeconds: 3
      periodSeconds: 3
      timeoutSeconds: 1
      failureThreshold: 3
    readinessProbe:  # Exec example
      exec:
        command: ["cat", "/tmp/healthy"]
      initialDelaySeconds: 5
      periodSeconds: 5
    startupProbe:  # TCP example
      tcpSocket:
        port: 8080
      failureThreshold: 30
periodSeconds: 10- HTTPGet: Check response code 200-399.
- TCPSocket: Check port open.
- Exec: Run command, exit 0 = success.
- GRPC: Check gRPC health (require app support).
Dưới đây là flowchart hands-on guide cho probes, minh họa quy trình success/fail và actions.
Các Lệnh Kubectl Để Quản Lý Và Debug Probes
- Xem probes:
kubectl describe pod probe-pod(xem Probes section, Events nếu fail). - Edit probes:
kubectl edit pod probe-pod(sửa YAML, nhưng Pod immutable nên thường recreate). - Debug fail:
kubectl get events | grep probe-pod(xem warning như ProbeFailed). - Check status:
kubectl get pod -o wide(xem READY column: 0/1 nếu readiness fail).
Bảng Tóm Tắt Types Probes Và Parameters
Types Probes
| Type | Mô tả | YAML Example | Use Case |
|---|---|---|---|
| HTTPGet | Check HTTP endpoint (code 200-399) | httpGet: {path: /health, port: 80} | Web apps với health endpoint |
| TCPSocket | Check port open | tcpSocket: {port: 8080} | Services không HTTP (e.g., DB) |
| Exec | Run command inside, exit 0=success | exec: {command: [“pg_isready”]} | Custom scripts check DB/file |
| GRPC | Check gRPC health | grpc: {port: 50051, service: “echo.Echo”} | gRPC apps |
Parameters
| Parameter | Mô tả | Default | Tuning Tip |
|---|---|---|---|
| initialDelaySeconds | Chờ trước probe đầu | 0 | Set cao cho slow start apps |
| periodSeconds | Khoảng cách probes | 10 | Giảm cho fast detect, tăng để giảm load |
| timeoutSeconds | Timeout probe | 1 | Tăng nếu check slow |
| failureThreshold | Fail liên tiếp để action | 3 | Tăng để tolerate transient fails |
Liên Hệ Với Chứng Chỉ CKAD
Domain Pod Design (18%) thường có task về probes, như:
- Cấu hình readiness để wait init complete.
- Thêm liveness để handle app hangs.
- Debug probe fail qua describe/events.
Mẹo thi:
- Nhớ failureThreshold để tránh premature restarts.
- Sử dụng HTTP cho web, Exec cho custom.
- Thời gian: 5-8 phút/task, verify bằng describe (xem Probe Failure events).
- Luyện:
kubectl explain pod.spec.containers.livenessProbe. - Kết hợp với resources (Bài 12) cho full optimization.
Thực Hành Thực Tế Trên Minikube
- Tạo Pod với probes: Sao chép YAML trên vào
probe-pod.yaml, apply:kubectl apply -f probe-pod.yaml. - Kiểm tra:
kubectl describe pod probe-pod # Xem Probes, Conditions (ContainersReady) - Simulate fail: Edit app để readiness fail (e.g., remove /tmp/healthy).
kubectl get pod probe-pod # Thấy READY 0/1 kubectl get events | grep probe-pod # Thấy Readiness probe failed - Liveness fail: Set command fail, xem restart count tăng.
- Cleanup:
kubectl delete pod probe-pod.
Nếu probe fail, Pod không Ready/Running, debug bằng logs/exec (Bài 11).
Kết Luận
Bài này mình đã hướng dẫn chi tiết sử dụng liveness và readiness probes, từ khái niệm đến YAML thực tế. Bạn giờ có thể build Pods robust, sẵn sàng cho domain Pod Design trong CKAD. Tiếp theo, ở Bài 14: Tối Ưu Hóa Pod Với HPA (Horizontal Pod Autoscaler), chúng ta sẽ khám phá scaling tự động.