
Why Is UFW Ineffective with Docker? A Security Pitfall Beginners Often Run Into

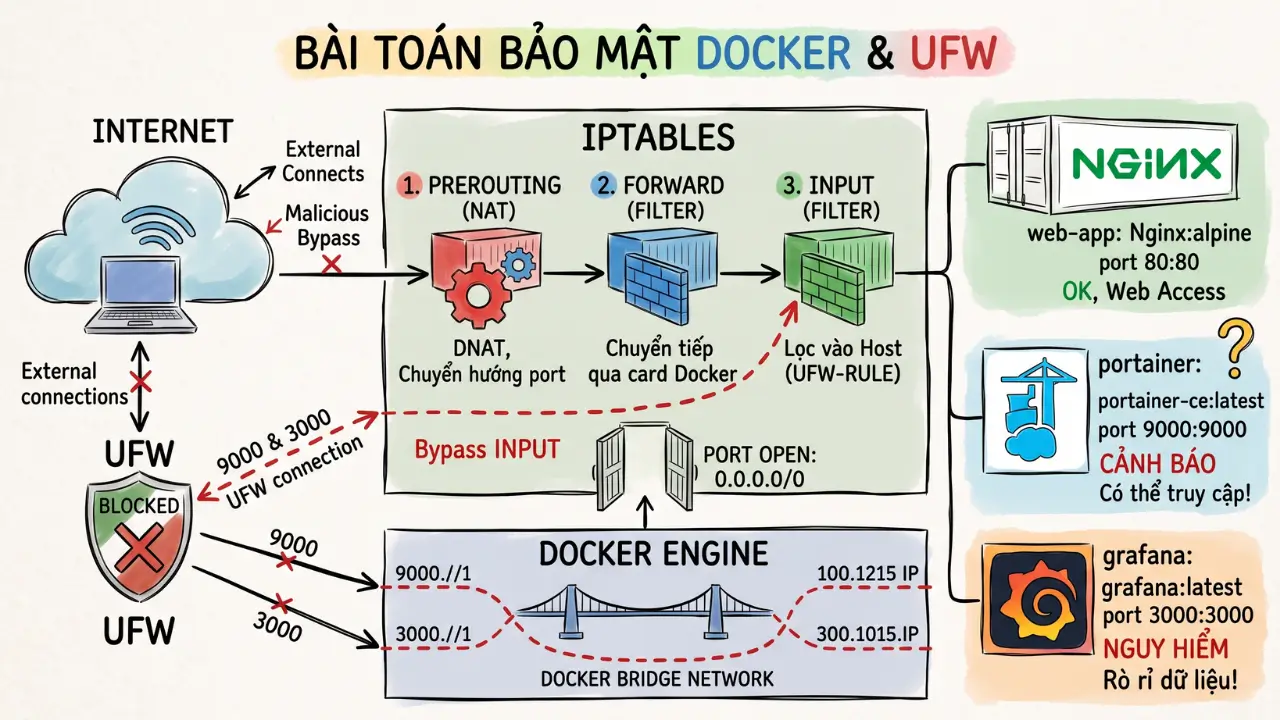
Table of Contents
I recently helped some developers and DevOps interns on my team understand a common issue when working with Linux and Docker, so I wanted to share this beginner-friendly article for anyone learning or setting up a new server.
When you are just getting started, you will often see tutorials telling you to enable UFW/IPtables, block all incoming ports, and only allow SSH, HTTP on port 80, and HTTPS on port 443. In larger enterprises, depending on internal policies, you may not even be allowed to enable it yourself.
When UFW shows its status as Active, it is easy to assume that the server is now secure.
However, once you use Docker Compose to deploy applications, for example Portainer for container management or Grafana for dashboards on a VPS, the problem starts to appear:
services:
  web-app:
    image: nginx:alpine
    ports:
      - "80:80"

  portainer:
    image: portainer/portainer-ce:latest
    ports:
      - "9000:9000"

  grafana:
    image: grafana/grafana:latest
    ports:
      - "3000:3000"
At this point, you might think:
I never opened ports 9000 or 3000 in UFW. Surely they can only be accessed from localhost.
But that is not actually the case.
Anyone on the Internet can access the Portainer management page directly through the server’s public IP. If you are still using a default password or have not configured an account yet, they may be able to gain control of your containers.
Why Can’t UFW Block Docker?
This part is important.
The reason is that Docker and UFW interact with iptables through different chains, with different processing order:
- PREROUTING chain (NAT table): receives packets first from the network interface and decides whether they should be redirected using DNAT.
- FORWARD chain (Filter table): forwards packets to another network interface, in this case Docker’s virtual network interface.
- INPUT chain (Filter table): filters packets going directly to the host. This is where UFW manages its rules.
A quick explanation of these two tables:
- NAT table: handles address translation, such as changing an IP address or port. Docker uses this table to map ports from outside the host into containers.
- Filter table: filters packets and decides whether traffic should be allowed through or blocked. UFW primarily operates here.
When a connection arrives on Portainer’s port 9000:
- As soon as the packet reaches the server, it matches Docker’s DNAT rule in PREROUTING, which changes the destination IP to the container’s internal IP.
- The packet then goes through FORWARD directly into the container.
Because the packet flow is:
PREROUTING -> FORWARD -> Container
it completely bypasses the INPUT chain.
As a result, UFW blocking rules in the INPUT chain have no effect.
Check Docker’s Automatically Created Rules
When you declare a port mapping in Docker Compose:
ports:
  - "9000:9000"
Docker automatically inserts a DNAT rule into the NAT table.
You can inspect it with:
sudo iptables -t nat -L DOCKER -nExample output:
Chain DOCKER (2 references)
target  prot opt source     destination
DNAT    tcp  --  0.0.0.0/0   0.0.0.0/0   tcp dpt:9000 to:172.18.0.5:9000
DNAT    tcp  --  0.0.0.0/0   0.0.0.0/0   tcp dpt:3000 to:172.18.0.4:3000
The 0.0.0.0/0 entry means the system accepts connections from any source on the Internet to ports 9000 and 3000 and forwards them into the containers.
Solutions for Different Scenarios
Depending on what you actually need, you can apply one of the following approaches.
Case 1: Containers Only Need to Communicate Internally
For example, a Prometheus collector only needs to collect data from the web application, and external users do not need direct access to Prometheus.
Solution: Remove the ports declaration entirely from the Compose file.
services:
  web-app:
    image: nginx:alpine
    ports:
      - "80:80" # Expose this port so users can access the application

  collector:
    image: prom/prometheus
    # Do not declare ports here
Containers in the same Compose file can automatically communicate with each other over Docker’s internal network using the service name, for example:
http://collector:9090
Port 9090 is then not exposed externally at all.
Case 2: You Need Access to an Admin Interface, but It Must Be Protected
For example, you need access to Portainer on port 9000 or Grafana on port 3000, but you do not want anyone else on the Internet to see them.
Solution: Explicitly bind the port to the loopback IP address 127.0.0.1.
services:
  portainer:
    image: portainer/portainer-ce:latest
    ports:
      - "127.0.0.1:9000:9000" # Only allow connections from the server itself

  grafana:
    image: grafana/grafana:latest
    ports:
      - "127.0.0.1:3000:3000"
Now external connections to ports 9000 or 3000 will be blocked.
When you need access, create an SSH tunnel from your local machine to the server:
ssh -L 9000:127.0.0.1:9000 user@IP_ServerThen open your browser locally and visit:
http://localhost:9000
You can use the application normally from there.
Case 3: Separate Compose Files by Environment
To avoid accidentally exposing ports in production, you should split your Compose configuration into separate files:
- docker-compose.yml (base file): defines the services without publishing internal ports.
- docker-compose.override.yml (local development file): publishes ports so developers can debug more easily.
When running locally, docker compose up automatically merges these files.
When deploying to the real server, use only the base file together with the production configuration:
docker compose -f docker-compose.yml -f docker-compose.prod.yml up -dThis greatly reduces the risk of accidentally leaving service ports exposed in production.
Case 4: Only Allow Specific IP Addresses to Connect
Sometimes you have to expose Portainer externally so team members can access it remotely, but you only want to allow a few trusted IP addresses, such as the office IP or a VPN IP.
As explained above, using a command such as:
ufw allow from IP_SERVER to any port 9000
will not work because the traffic bypasses UFW’s INPUT chain.
Solution: Configure the DOCKER-USER chain directly in iptables.
This is a chain Docker provides specifically so users can define their own packet-filtering rules before Docker handles the routing.
Run the following commands directly on the server:
# Allow a trusted IP to access port 9000
sudo iptables -I DOCKER-USER -p tcp --dport 9000 -s <IP-trusted> -j ACCEPT

# Block all other IP addresses from connecting to this port
sudo iptables -A DOCKER-USER -p tcp --dport 9000 -j DROP
To make sure these rules are automatically restored after the server reboots, install:
sudo apt install iptables-persistent
sudo netfilter-persistent save
Alternative Solution: Use ufw-docker
If you do not want to manually work with complex iptables commands, you can use a popular open-source tool called ufw-docker.
This tool helps automate the synchronization of UFW rules with Docker’s networking system.
After installing it, you can use familiar commands such as:
# Only allow the trusted IP to access port 9000 of the portainer container
ufw-docker allow portainer 9000 from IP_Trust
Conclusion
Docker’s automatic iptables configuration makes application deployment extremely convenient, but it can also unintentionally bypass the UFW protection layer without many people realizing it.
Always remember this rule:
Only expose ports that genuinely need to be accessible to end users, such as 80 and 443. All other administrative tools and internal services should be bound to 127.0.0.1 and accessed through an SSH Tunnel or VPN.